Tutorial
In this tutorial we will see how to create, step by step, a server side Flask application communicating with a Vue3/Inertia frontend using Typescript.
App skeleton
First let’s create the app skeleton:
.
|-- Makefile
|-- README.md
|-- app.py
|-- static
|   |-- dist
|   `-- vue
|-- templates
|   `-- base.html
The app.py file is a simple single file Flask application using as arguments
the templates directory as template_folder and static/dist as
static_folder.
The static/vue store the frontend application powered by Vue3/Inertia. Vue
generates two JavaScript files on build named app.js and chunk-vendors.js
containing respectively our app and third-party modules. It will be configured to
generate these files in our static/dist folder to be available for our Flask
application.
Since, there are going to be two different applications (Python and Vue), a
Makefile will be used to run the parallel build and provide a hot-reload
development environment.
Server-side setup
Install dependencies
Install the Inertia server-side framework and adapters using pip:
pip install -U flask flask-inertia
The Flask application
Create a Flask application using the Inertia adapter in our app.py file:
#!/usr/bin/env python3

from flask import Flask
from flask_inertia import Inertia

# `base.html` template will be used as inertia default template
INERTIA_TEMPLATE = "base.html"

# init the app setting `template_folder` and `static_folder`
app = Flask(
    __name__,
    template_folder="templates",
    static_folder="static/dist",
)

# set the config
app.config.from_object(__name__)

# init inertia adapter
Inertia(app)
The root template
Setup the root template used by Inertia adapter that will be loaded on the first page visit, it will contain the routes to the files generated by the Vue application:
<!DOCTYPE html>
<html>
  <head>
    <meta charset="utf-8" />
    <meta name="viewport" content="width=device-width, initial-scale=1.0, maximum-scale=1.0" />
    <title>My app</title>
    <link href="{{ url_for('static', filename='css/app.css') }}" rel="stylesheet" />
    <script lang="javascript">
      {{ inertia.include_router() }}
    </script>
  </head>
  <body>
    <div id="app" data-page='{{ page | tojson }}'></div>
    <script src="{{ url_for('static', filename='js/chunk-vendors.js') }}"></script>
    <script src="{{ url_for('static', filename='js/app.js') }}" defer></script>
  </body>
</html>
The inertia.include_router expose the Flask routes to the client side
implementing a window.reverseUrl method.
Client-side setup
Build a Vue app using Typescript with the @vue/cli tool.
Install dependencies
cd static/vue
npm install -G @vue/cli
vue create .
Choose the Vue version and the Typescript support.

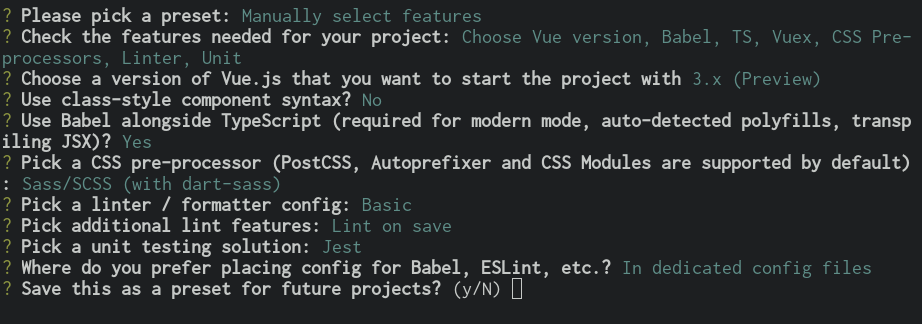
Install the Inertia dependendencies:
npm install @inertiajs/inertia @inertiajs/inertia-vue3 @babel/plugin-syntax-dynamic-import
Reconfigure the app deleting all the auto generated files we won’t need and creating missing folders:
rm -rfv src/App.vue src/components/ src/assets/logo.png public/
mkdir src/pages/
Vue configuration
There are modification to the Vue configuration to make it usable with our application:
By default, Vue embed a Webpack-dev-server to serve the app. It will be
disabled in the package.json file replacing it with a build development
mode. This task will allow you to configure a hot-reload development
environment generating the app.js and chunk-vendors.js files. These files
will be served by the Flask app.
{
  "scripts": {
    "build:dev": "vue-cli-service build --mode development --watch",
    "build:prod": "vue-cli-service build",
    "test": "vue-cli-service test:unit",
    "lint": "vue-cli-service lint"
  }
}
Vue needs to be configured to generate the JavaScript code into the static/dist
configured in the server-side application. Based on the application architecture,
there will be no need to generate a html file with Vue since our base.html
will be rendered by Flask. Those configuration are stored in a vue.config.js
file in the static/vue folder.
module.exports = {
  publicPath: '/dist/',
  outputDir: '../dist/',
  // disable hashes in filenames
  filenameHashing: false,
  // delete HTML related webpack plugins
  chainWebpack: config => {
    config.plugins.delete('html')
    config.plugins.delete('preload')
    config.plugins.delete('prefetch')
  }
}
Integrate Inertia
The application will use code-splitting, allowing to break it apart into smaller
files. To use it with Inertia, create a babel.config.js file in static/vue
folder containing:
module.exports = {
  presets: [
    '@vue/cli-plugin-babel/preset'
  ]
}
Next, modify the static/vue/src/main.ts file as followed:
import { createApp, h, App } from 'vue'
import { createInertiaApp } from '@inertiajs/inertia-vue3'
import '@/css/app.css'

type StrOrNum = string | number

declare global {
  interface Window {
    reverseUrl(urlName: string, args?: Record<string, unknown> | StrOrNum | StrOrNum[]): string
  }
}

// create a plugin to use window.reverseUrl in our Components
const routePlugin = {
  install: (app: App, _options: Record<string, unknown>) => {
    app.config.globalProperties.$route = window.reverseUrl
  }
}

createInertiaApp({
  resolve: async name => {
    const page = await import(`./pages/${name}`)
    return page.default
  },
  setup({ el, app, props, plugin }) {
    const vueApp = createApp({ render: () => h(app, props) })
    vueApp.use(plugin)
    vueApp.use(routePlugin)
    vueApp.mount(el)
  }
})
In order to tell TypeScript about this new property $route, we are going to use
module augmentation as mentioned in
Vue 3 documentation.
Create a new route-plugin.d.ts which will be used by TypeScript to determine
components’ global methods:
import { Inertia } from '@inertiajs/inertia'

type StrOrNum = string | number

declare module '@vue/runtime-core' {
  export interface ComponentCustomProperties {
    $route: (urlName: string, args?: Record<string, unknown> | StrOrNum | StrOrNum[]): string
    $inertia: typeof Inertia
  }
}
Create your views
With Inertia, each page in your application has its own controller and corresponding Vue component. This allows you to retrieve just the data necessary for that page, no API required.
First view
Update your app.py file to add a new route using the module render_inertia
method:
from flask_inertia import render_inertia

# init app as described above

@app.route("/")
def index():
    """Example route."""
    fake_data = {
        "foo": "bar",
        "fiz": "buzz",
        "num": 42,
    }
    return render_inertia("Index", props=fake_data)
This route will use a Index.vue page stored in static/vue/src/pages. It
can be implemented as followed:
<template>
  <div class="content">
    <p class="field">
      <span class="label">Foo :</span>
      <span class="value">{{ foo }}</span>
    </p>
    <p class="field">
      <span class="label">Fiz :</span>
      <span class="value">{{ fiz }}</span>
    </p>
    <p class="field">
      <span class="label">Num :</span>
      <span class="value">{{ num }}</span>
    </p>
  </div>
</template>

<script>
  import { defineComponent, PropType } from 'vue'

  export default defineComponent({
    name: 'Index',
    props: {
      foo: {
        type: String as PropType<string>,
        required: true
      },
      fiz: {
        type: String as PropType<string>,
        required: true
      },
      num: {
        type: Number as PropType<number>,
        required: true
      },
    }
  })
</script>

<style lang="scss" scoped>
  .content {
    width: 80%;
    margin: auto;
    .field {
      line-height: 1.5em;
      width: 100%;
      .label: {
        padding-left: .2em;
        width: 50%;
        text-align: right;
      }
      .value {
        padding-left: .1em;
        font-weight: bold;
      }
    }
  }
</style>
For more options creating your views, please read the provided Inertia documentation.
Add links between your routes
Create a second dummy route to see how to create links between our components.
Update your app.py file adding a second route:
@app.route("/parameters/")
def params():
    """Second route."""
    return render_inertia("Params")
Then, create a corresponding Vue component named Params.vue in the pages
folder:
<template>
  <strong>It works</strong>
</template>

<script>
  import defineComponent from 'vue'

  export default defineComponent({
    name: 'Params'
  })
</script>
Flask-inertia provides a window.reverseUrl client side to allow Vue to access
Flask defined routes. The line
in the main.ts file make it usable in all the application components registering a
$route method as a global property.
To create Inertia requests, inertia-vue3 implements a new Vue component named
Link. It can be used in the Index page as followed:
<template>
  <div class="content">
    <p class="field">
      <span class="label">Foo :</span>
      <span class="value">{{ foo }}</span>
    </p>
     <p class="field">
       <span class="label">Fiz :</span>
       <span class="value">{{ fiz }}</span>
     </p>
     <p class="field">
       <span class="label">Num :</span>
       <span class="value">{{ num }}</span>
     </p>
     <Link :href="$route('params')">
       My params
     </Link>
  </div>
</template>
Automate development environment
To run the application in development mode two processes needs to executed:
A Flask process running the app in development mode
A Vue build process watching for any changes in the code source files
For more convenience, a Makefile will be used to run these processes in parallel with a single command. Implement the Makefile present in your project root folder as followed:
# use parallel tasks
MAKEFLAGS+="-j 2"

.PHONY: all
all: dev

# run Flask app in development mode
dev-python:
       FLASK_APP=app:app FLASK_ENV=development flask run

# build Vue app in development mode with hot-reload
dev-vue:
       @npm run --prefix static/vue/ build:dev

# run development environment
dev: dev-python dev-vue
Then, run make dev to run your development environment.